Showing posts with label commission. Show all posts

Sunday, June 09, 2019

Inspired Inspiration

         
These two MetroCard paintings served as inspiration for two commissioned pieces -- same subject, but on larger 8"x10" cradled wood panels. Success!

First steps of the pigeon...


Decided to make it a bit larger on the 8"x10" panel.


Gleam in his eye.


Coffee cup  - it's our pleasure to serve you!


Finals.

Tuesday, June 10, 2014

Putting the Custom back in Customer - Part 3 of 6

Next up in the commission series - this daunting landscape of a small city in Italy. Anyone recognize it? It reminds me of Florence but I don't see that iconic dome or any sign of the Arno River. 

My client decided that this photo would be another of the 3 to be recreated in black and white, no watercolor. First, I de-saturated the image so I wouldn't be distracted by the color and applied a grid to the picture. As before, this helps me digest the scene in smaller bites and keep the proportions in order.


I used photoshop to tweak the levels of dark to light, this helped me see more detail by exaggerating the lights and darks.

I again applied a light pencil grid to my paper and dove right in. 


Here's a close-up:


Last step, applying layers of ink, thinned with water, to create volume. Here's the final image, cropped to 9"x12." There wasn't a singular focal point in the original photo, it was rather flat, so it was a challenge. Still, I think the end result is lively and interesting. What do you think?


Next up, the Italian country side in living color……..

Friday, May 30, 2014

Putting the Custom Back in Customer - Part 2 of 6

Actually completing one of the 6 pieces commissioned gave me some confidence -- the dread began to dissipate. I decided to turn to one of the ink and watercolor pieces next, to switch up the action. 

I pulled my watercolors down from the shelf, literally dusting them off since I hadn't used them in quite a while. A quick rinse of the palette under the faucet restored the exposed clumps of paint to a fresh and tempting bounty of color:

Unrolled my packet of brushes as well.

Note my battered radiograph pen: -I have about a dozen of these in varying line widths but they are notoriously delicate and easily clogged. Thankfully I was able to get my .50 weight flowing - I used it for the line work in each of the paintings/drawings.

I decided to work on the Hawaii color photo next as I thought it would be the most straightforward. Here is the photo my client provided with my own grid added in photoshop:


Looks like a solid black silhouette, with just huge clumps of black along the lower quarter of the painting. I decided to adjust the levels again (in photoshop) so I could get a better idea of what was going on in all those shadows. It's surprising how much more detail is hidden in those dark areas:

 I knew I wanted to simulate the appearance of the original photo but the level-adjusted version gave me a bit more information to create an underlying structure. Even if it would ultimately disappear under layers of watercolor, it was helpful for me to see more of what is actually happening. 

Here's the first line drawing:


Ok, it's a start. Then more line and some layers of watercolor. I knew that hotspot of the sun would essentially be the one spot on the page that had no ink, no color.  I had to be careful to keep that small area completely clear, working from light to dark:


I decided to mix deep Prussian blue with the black ink to create the shadows, that gave them a little more complexity and depth, rather than just painting everything with a deep flat black.
And the final, cropped down to 9"x12," - done!


Stay tuned for more tomorrow…….

Tuesday, August 06, 2013

Vacationland

Hello, Night Shifters - I'm back after a brief hiatus from blogging.

Lest you think I've dropped off the artistic map, it actually has been a beehive of activity here; and every evening I've found myself saying about one creation or another, "I need to post this on The Night Shift."


Of course the fun is in the making and the drudgery is in the posting. But that's only because I don't want to do a crappy job of just snapping iphone pics and blurting out a few random thoughts. 

I like to  take the extra steps of scanning, shooting, cropping and thinking before I post on the blog. So I have a lot of delicious treats in the pipeline that are gradually ready to make their Night Shift debut.

Best of all, I'm officially on vacation for 4 weeks, starting yesterday, so I'll no doubt be brimming over with new work, new ideas and, of course, finally finishing up my bird series - yeowzah!

Let's start with this tiny treasure trove......

I received a message from a buyer on Etsy who wanted to purchase this Metro Card painting of the Twin Towers :


World Trade Center No. 11
3.25" x 2 " oil on Metro Card

I'll admit, it's a bit somber, gloomy, funereal even. But also a lovely geometry and respectful. No flaming, crashing planes and soaring eagles like so much other WTC "art."

My buyer asked if I could create another painting to partner with this one: a rendering of the Freedom Tower, currently still under construction at the WTC site. 

And so I did --


Freedom Tower No. 1
 3' x 3' x7' Oil on Metro Card

More celebratory, more hopeful in the light of day, the perfect companion piece.

Ok, that's it for today, but I'll be back shortly, friends -- looking forward to sharing so much more.


Wednesday, April 25, 2012

City Painting Packs it in

Finished!


I

And finally on its way  --


With a bit more cardboard, plastic, bubble wrap and tape, of course .... it's huge.


Going all the way across the country -- UPS ground should get it there by early next week. 

Anybody else out there have an idea for a custom painting -- your favorite places, family names, or what-have you, email me for a quote!

,

Saturday, April 07, 2012

City Painting - final stages

I'm pleased with how this painting is coming along -- and am nearly finished.


I was skeptical about the color-combination requested -- but using the Payne's Gray as the base, a nice cool, bluish gray, has resulted in a really lush, rich painting. 


It's funny, but sometimes I can't see the problem areas clearly until I take a wide photo. The camera does cause some distortion, since the painting is so large and I'm taking the photo at a short distance. Also, the uneven lighting casts some glare on the surface.


Even allowing for some slight curving distortion, in the photo, I can still see some areas that I want to even out a bit. The big "C" in Tacoma is a little lopsided, the baseline text of "WEST" in the upper right is uneven, and the surface of the letters in "Las Vegas" need some work.


But otherwise, almost done!


Do you have an idea for your own places/names painting? Put your order in  here,
or email me for more information.

Wednesday, March 28, 2012

A Custom City Painting in Progress - Part 2


So where did we leave off?


I blocked in the entire background field, varying the hue and the value, leaving nice thick swaths of brush strokes. This is a painting after all, not a bstore-bought poster. Let the hand-made quality shine through.

Now, on to the type.

And with typography, there's a fine line between aesthetically beautiful, hand -made  renderings ... and just plain sloppy. That is why I did take great care to transfer the type to the canvas: size, proportion and alignment are true and measured. Edges are strong if not precise. At a distance, the edges of this particular typeface appear strong, clean and clear. Close inspection may reveal soft variations and irregularities -- I don't paint with a ruler - but the general strength of the line is strong and solid.

I love lines.

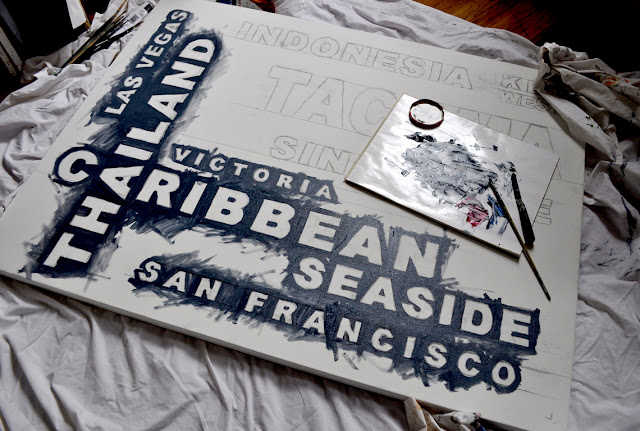
My client wanted the type to be white, with a slight shadow or dark edge. Flat white fill would have been an easy solution. But instead, I began painting the type with a dark layer of Payne's Grey and then gradually built it up with lighter values of paint. 

See the edges of "Las Vegas"   and then the light gray filling inside the letters (below). Compare to the word beneath, where brighter layers of white have been added on top of the same treatment.

See what I mean? The type is no longer just flat. It's nice and chunky.


Up close and personal, it's not perfect. But it works.


"C" for super "CHUNK."


I'm very close to finishing and I'm pleased with the result so far. Check back over the weekend to see the final painting.

Please contact me if you have a painting of your own in mind -- cities, countries, places or names of your choosing. Your family members, perhaps?  Anything is possible; I can create a unique piece for you or a loved one.


Tuesday, March 27, 2012

A Custom City Painting in Progress - Part 1


Shades of gray...........


I'm so pleased to be taking on another commissioned "cities" painting -- and I've been documenting the steps so you can see that it truly is a painting that is custom made-to-order.


My client has requested a personal array of cities to be displayed on canvas, as offered here, and also chosen a color palette: white lettering on charcoal gray. 


Here we go............


First, I created a layout of the type on my mac. The result is not very painterly, far from it -- but it does provide a plan for the painting.


I then scale up the image to 36"x48" and printed out black and white versions of the image in pieces, on regular 8.5" x 11" paper. I will use these printouts to transfer the design to the canvas surface.


To transfer the type, it's time to go old school - I cut the pieces to transfer, trimming them down to the edges, and then flip them over. I take a nice soft piece of charcoal and cover the back side of the paper with it, until it's thoroughly covered.


After marking the canvas with a t-square, creating the alignment lines for the type, I lay down the printed sheets of text, charcoal side down, and tape in place. Using a ball point pen (but any sort of stylus will do)  I trace over the edges of the type on the printed side of the paper strips. This effectively transfers the charcoal onto the canvas surface.


This is a very old technique -  using a "cartoon"  -  a variation of which would be to prick very tiny holes through the original printed paper (or drawing), to be transferred. After placing the pin-pricked paper on your canvas, you "pounce" it with charcoal dust which passes through the holes onto the canvas, effectively transferring the outlines of your design.


Since the charcoal is easily smudged, I  next used a soft pencil to roughly re-draw the lines and make them stronger. City by city, the canvas fills up with sketches.


Now it's time to mix some paint. 


I could use a simple mix of black and white, but that would be rather dull and flat.  Rather than using any black, I am using Payne's Gray (below, left), which is a dark, cool, bluish gray, made from mixtures of black, blue and occasionally crimson pigments. I also pulled out tubes of Prussian Blue, (second from left), Alizarin Crimson (3rd from left) and Titanium White (far right).


The Payne's Gray comes out of the tube looking as if it were black. As I mix in some Titanium White, it begins to take on a cool, rich and smokey gray color.


By adding small, sparing amounts of the Prussian Blue, the Alizarin Crimson and the Titanium White,  I can change the appearance of the gray ever so slightly. I don't mix large amounts of paint at one time, so each time I mix up a quantity of paint, it is never the same. And that's great!  I'm not painting a living room wall nor the side of a house -- variation in color and value is a good thing. 


I begin to lay in the background color around the edges of the lettering.


I mix and re-mix, varying the amounts of pigment and white and gradually fill in the background around the letters, letting the variations in value and hue remain.


Next up -- layers of paint on the letters.... stay tuned for part 2.......