Tuesday, May 08, 2012

Hot Mess


Yes, my work space is typically a hot mess. 

But I'm referring more specifically to that stage of a painting when all hope is lost or, at first glance, appears so. The first touch of paint to canvas can give one pause because it usually looks horrific, lacking all hope.  A singular Hot Mess.

To wit:


Polly want a make over?

Yes.

Charcoal showing through, I apply thin washes of paint with turpentine and map out the color plan for the painting. Veins and capillaries snake over the canvas.


It's still a hot mess.


Polly want a pedicure?


I add washes of color across the background, too, hoping that the charcoal grid will soon disappear.


Ok, a layer of paint everywhere, time to build up some more layers. Using less turpentine and thicker paint.


Talk to me, bird.


I have a colleague who owns a parrot. A bit of a sociopath, (the bird, that is,not my colleague) he would imitate his owner's voice and call the dog  to come upstairs. When the gullible mutt bounded into the room, the parrot  promptly cursed the dog out, calling him "bad dog, bad dog!"

The claws are coming out......!


That parrot was also adept at mimicking that squeaking sound  that you make when you wipe down a window with paper towels and windex - eeen-eeen-eeen eeeeee,   eeen-eeen-eeen

Coming together.


Decide to add some thatch...a little more island stylee.


Just about done -- might want to do a little more with the background, perhaps some glazing. Dunno. But so far so good. 

What do you think?

Wednesday, May 02, 2012

A Flock of Sea Gulls


As part of my ongoing commission project -- to paint 15 paintings, each representing a bird found in Jamaica -  I've decided to tackle several at once. I've been gathering more references, making small sketches and then scaling those drawings up on to 2'x3' canvases.  In addition to the Parrot, I've completed 6 more so far.

JACANA


NIGHT HERON


  AUNTY KATY aka Banana Quit


 DOCTOR BIRD

JOHN CHEWITT  aka Black Whiskered Vireo


  KINGFISHER


Wednesday, April 25, 2012

City Painting Packs it in

Finished!


I

And finally on its way  --


With a bit more cardboard, plastic, bubble wrap and tape, of course .... it's huge.


Going all the way across the country -- UPS ground should get it there by early next week. 

Anybody else out there have an idea for a custom painting -- your favorite places, family names, or what-have you, email me for a quote!

,

Tuesday, April 17, 2012

Birdland


Count on me to exhaust every possible "bird" pun over the next few weeks. 


Or months.


Because I've taken on a spectacular and challenging commission: to create a series of 15 oil paintings, each 24" x 36," and each depicting a bird native to Jamaica. 


I've never even drawn a bird before, let alone made a 2 foot by 3 foot painting of a bird. Or, um, 15 birds.


And my fresh, stretched canvases arrived this week -- 


so I must get started. Pronto.


I was given a list of 15 birds and began to search online for references.  


I have to confess, I'm no birder. That is either a gene that skipped my generation OR is one that is simply lying dormant until I reach a Certain Age, whereupon I will suddenly find all things ornithological completely captivating. And that has not happened yet.


But I digress.


So my bird reference search continued. I won't be painting a copy of someone's photograph but I needed to know what all of these birds look like -- their size, coloring, posture. I've downloaded dozens of images and printed out those that would be helpful to catch a pose, or color samples or even an environment in which to place each bird.


Infinite possibilities.


The must frustrating thing I've learned along the way, albeit not the most surprising, is that the name Jamaicans have given to a local bird is not necessarily the same name that the rest of the planet has adopted. 


Surprise, surprise.


But to be fair, the Jamaican nomenclature typically outshines all other options. To wit:


In Jamaica:  Cling Cling       Elsewhere: Greater Antillean Grackle


In Jamaica:  John Chewit      Elsewhere: Black-whiskered vireo  


The local flayvah has more flayvah.


And who knew that an Aunty Katy and a BananaQuit are one in the same? But of course!


So I decided to jump in with a familiar friend, the Parrot. Just about everybody calls a parrot a parrot.  I grabbed a pose from one photo and incorporated the thatchy-palm leaves from another to work up a sketch on paper. I drew a grid on my pad so I could scale my sketch up to the canvas.


Here's the light grid, in the same scale, drawn on the blank canvas:


This made it so much easier to re-draw my sketch on the canvas:


Now, the hard part -- painting these birdies. Time to crank up the music in the studio and get them flying...................


Saturday, April 07, 2012

City Painting - final stages

I'm pleased with how this painting is coming along -- and am nearly finished.


I was skeptical about the color-combination requested -- but using the Payne's Gray as the base, a nice cool, bluish gray, has resulted in a really lush, rich painting. 


It's funny, but sometimes I can't see the problem areas clearly until I take a wide photo. The camera does cause some distortion, since the painting is so large and I'm taking the photo at a short distance. Also, the uneven lighting casts some glare on the surface.


Even allowing for some slight curving distortion, in the photo, I can still see some areas that I want to even out a bit. The big "C" in Tacoma is a little lopsided, the baseline text of "WEST" in the upper right is uneven, and the surface of the letters in "Las Vegas" need some work.


But otherwise, almost done!


Do you have an idea for your own places/names painting? Put your order in  here,
or email me for more information.

Wednesday, March 28, 2012

A Custom City Painting in Progress - Part 2


So where did we leave off?


I blocked in the entire background field, varying the hue and the value, leaving nice thick swaths of brush strokes. This is a painting after all, not a bstore-bought poster. Let the hand-made quality shine through.

Now, on to the type.

And with typography, there's a fine line between aesthetically beautiful, hand -made  renderings ... and just plain sloppy. That is why I did take great care to transfer the type to the canvas: size, proportion and alignment are true and measured. Edges are strong if not precise. At a distance, the edges of this particular typeface appear strong, clean and clear. Close inspection may reveal soft variations and irregularities -- I don't paint with a ruler - but the general strength of the line is strong and solid.

I love lines.

My client wanted the type to be white, with a slight shadow or dark edge. Flat white fill would have been an easy solution. But instead, I began painting the type with a dark layer of Payne's Grey and then gradually built it up with lighter values of paint. 

See the edges of "Las Vegas"   and then the light gray filling inside the letters (below). Compare to the word beneath, where brighter layers of white have been added on top of the same treatment.

See what I mean? The type is no longer just flat. It's nice and chunky.


Up close and personal, it's not perfect. But it works.


"C" for super "CHUNK."


I'm very close to finishing and I'm pleased with the result so far. Check back over the weekend to see the final painting.

Please contact me if you have a painting of your own in mind -- cities, countries, places or names of your choosing. Your family members, perhaps?  Anything is possible; I can create a unique piece for you or a loved one.


Tuesday, March 27, 2012

A Custom City Painting in Progress - Part 1


Shades of gray...........


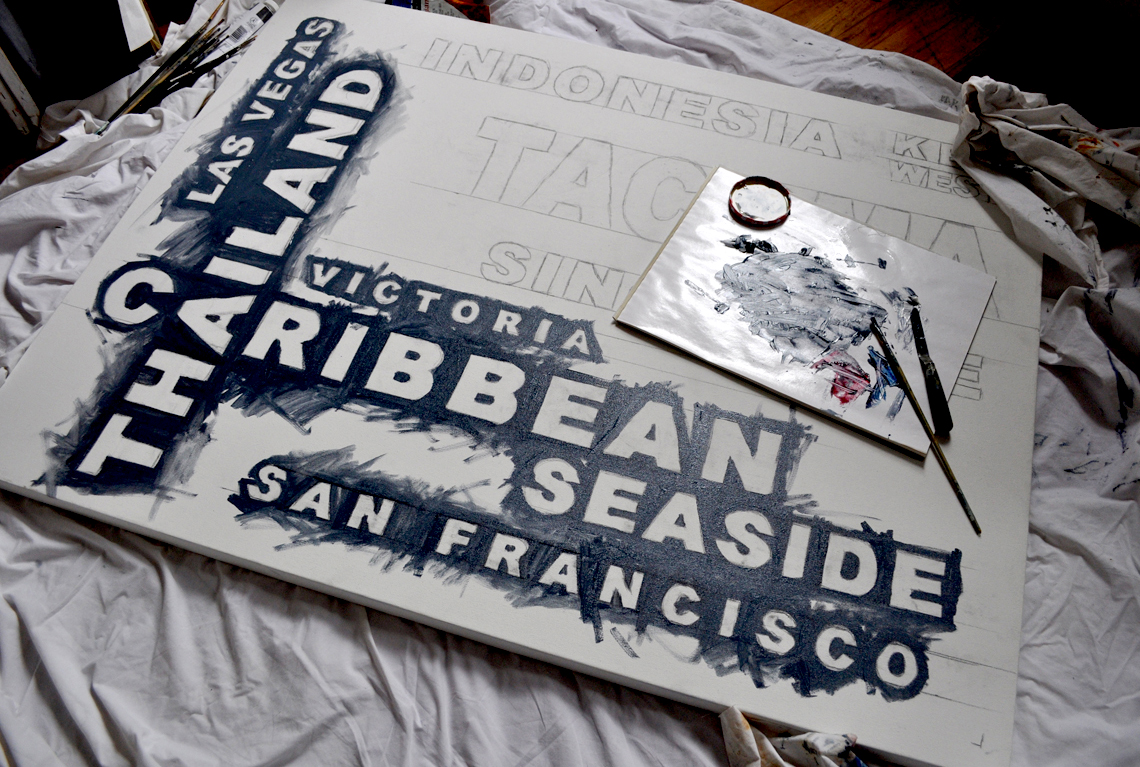
I'm so pleased to be taking on another commissioned "cities" painting -- and I've been documenting the steps so you can see that it truly is a painting that is custom made-to-order.


My client has requested a personal array of cities to be displayed on canvas, as offered here, and also chosen a color palette: white lettering on charcoal gray. 


Here we go............


First, I created a layout of the type on my mac. The result is not very painterly, far from it -- but it does provide a plan for the painting.


I then scale up the image to 36"x48" and printed out black and white versions of the image in pieces, on regular 8.5" x 11" paper. I will use these printouts to transfer the design to the canvas surface.


To transfer the type, it's time to go old school - I cut the pieces to transfer, trimming them down to the edges, and then flip them over. I take a nice soft piece of charcoal and cover the back side of the paper with it, until it's thoroughly covered.


After marking the canvas with a t-square, creating the alignment lines for the type, I lay down the printed sheets of text, charcoal side down, and tape in place. Using a ball point pen (but any sort of stylus will do)  I trace over the edges of the type on the printed side of the paper strips. This effectively transfers the charcoal onto the canvas surface.


This is a very old technique -  using a "cartoon"  -  a variation of which would be to prick very tiny holes through the original printed paper (or drawing), to be transferred. After placing the pin-pricked paper on your canvas, you "pounce" it with charcoal dust which passes through the holes onto the canvas, effectively transferring the outlines of your design.


Since the charcoal is easily smudged, I  next used a soft pencil to roughly re-draw the lines and make them stronger. City by city, the canvas fills up with sketches.


Now it's time to mix some paint. 


I could use a simple mix of black and white, but that would be rather dull and flat.  Rather than using any black, I am using Payne's Gray (below, left), which is a dark, cool, bluish gray, made from mixtures of black, blue and occasionally crimson pigments. I also pulled out tubes of Prussian Blue, (second from left), Alizarin Crimson (3rd from left) and Titanium White (far right).


The Payne's Gray comes out of the tube looking as if it were black. As I mix in some Titanium White, it begins to take on a cool, rich and smokey gray color.


By adding small, sparing amounts of the Prussian Blue, the Alizarin Crimson and the Titanium White,  I can change the appearance of the gray ever so slightly. I don't mix large amounts of paint at one time, so each time I mix up a quantity of paint, it is never the same. And that's great!  I'm not painting a living room wall nor the side of a house -- variation in color and value is a good thing. 


I begin to lay in the background color around the edges of the lettering.


I mix and re-mix, varying the amounts of pigment and white and gradually fill in the background around the letters, letting the variations in value and hue remain.


Next up -- layers of paint on the letters.... stay tuned for part 2.......